How to Fix A Busted Metal Edged Box

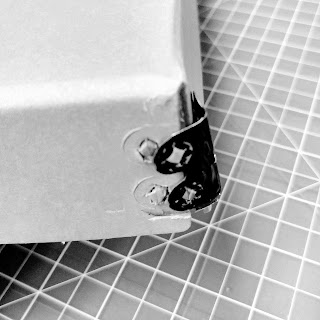
Don't you hate it when this happens?
You've spent hard-won dollars from your scant, annual supply budget on acid-free, metal-edged storage boxes only to have the corners pop off! What to do? You could slap a few layers of some sort of tape on there, but you would want to use some extremely strong yet also archives-grade adhesive, lest you introduce some off-gassing plastic junk onto the box, and that would just be ... yuck.
There is another simple solution involving precisely one other common archives supply and a darning needle. A couple of steps and your box corners will be back together and strong as new. This method works even if the metal fastener has been lost entirely!

Step One: The metal fasteners on these boxes are not the most solid things to begin with. They adhere to the box simply by their spiky metal bits. To re-attach them and make them stronger, you're going to poke holes all the way through the board as they are aligned with the holes in the metal (and the indents the metal has left on the board). I use a nice thick darning needle for this, which I pull all the way through the board to make a nice, clean hole.


Step Two: If you're an archivist, you probably have twill tape around for tying up volumes that are coming apart, tying up rolled items, and the like. Museum folks also use this material for creating labels for fabric artifacts. Cotton twill tape is perfect for this, but any other dye-free, cotton string will do. Thread up your darning needle with a good, long strand. Starting on one side of the box (or lid, as I'm fixing here) pull the tape through one hole of the metal bracket and its corresponding hole in the board, and back out the hole immediately below it.
The steps are the same if the metal bracket is gonzo, too. You're keeping to one side to avoid having the twill tape cut across the corner inside the box, which would either make the lid hard to get on, or potentially make things fit weirdly in the box.
Step Three: Next you'll move on to the other side of the corner. Starting with the hole around the corner from the one you just came out of, go in from the outside and back out through the next hole up. You've now made a firm stitch around the outside of the box.

If it's just a two-hole lid like this, you're essentially done! Tie off the twill tape and trim your ends. If you're doing the whole side of a box, continue stitching in this manner until you have a neat row of horizontal stitches all the way down. The inside of the corner should have vertical stitches that lay nice and flat against the board.
And there you have it! Not perfect and pristine like a box fresh from your favorite vendor, but back in one piece, functional and ready for years of service in storing and protecting your collections.


Comments
Post a Comment